If you have a family member or friend who has mobility issues, or if you have one yourself, constructing a wheelchair ramp can help you to live a safe and independent lifestyle.
Wheelchair ramps increase house accessibility for persons who are unable to utilize stairs or require a gentler, less stressful approach to enter or exit their home.
This accessibility project must guarantee that the ramp fits the demands of the occupants, conforms with construction codes, and is durable and safe for usage in all weather conditions.
In this article, we’ll go over some pointers for creating a wheelchair ramp.

Building a Wheelchair Ramp
Before you start designing and building a wheelchair ramp, consider the following:
- Who is the main user?
- What form of assistance device (cane, crutches, walker, manual or electric wheelchair) does the person use?
- Will the individual’s abilities change?
- What are the zoning regulations in your area?
These are just a few of the questions you’ll need to answer before you start your project.
The information provided here should assist you in this procedure.
Planning the Ramp
1. Decide on the ramp‘s longevity.
Before you ask your local building code office if you need a permit or start gathering supplies, you must decide if the ramp will be a temporary structure or a permanent addition to the building.
A temporary/portable ramp is far easier to build than a permanent ramp, which may require expert services and additional government control.
It should be noted, however, that in some communities, regardless of the structure’s length, a permit is required.
2. Plan the location.
If a building permit is required, it is preferable to have a plan put up that shows your property borders, the size and location of your home, and where the ramp will be built.
Include the ramp’s height, length, and width, as well as its distance from the sidewalk or roadway.
3. Estimate the cost.
A building permit may be required in addition to the cost of supplies and building materials, as well as any contractor or carpenter costs.
The anticipated cost of installing the ramp determines the cost of a building permit in many towns and counties across the United States.
In Erie, PA, for example, there is a flat rate permit charge of $29 if the project costs less than $2,000, but if it costs more than that, the fee is doubled to $29 + $6 for every $1,000 over $2,000.
4. Secure a building permit.
Before constructing a wheelchair ramp, several municipalities require a municipal building permission.
This varies greatly from municipality to municipality.
There are significant variances between cities in the United States.
In St. Louis, MO, for example, wheelchair ramps are excluded from construction permits if they are built over existing stairs or are not permanently linked to the property.
However, in Erie, PA, all wheelchair ramps require a city permit, which can cost up to $29 depending on the cost of the ramp.
Measuring Materials
1. Choose a shape/layout.

Most builders use one of three basic ramp configurations.
The first type of ramp is a straight (also known as an in-line) ramp, which contains the ramp as well as any necessary landings in a straight line.
The second type of ramp is an L-shaped (also known as a dog-legged) ramp that bends at a 90-degree angle at the intermediate landing.
If the L-shaped ramp runs around the house, it is known as a “wrap-around” ramp.
The third type of ramp is a switchback ramp, which has a 180-degree turn at one or more intermediate landings.
2. Provide a sufficient slope.

The slope, or angle of incline, of the ramp is defined by the amount of increase that the structure must handle.
The ramp must have a minimum ratio of 1:12 for many constructions.
That is, the ramp extends 12 inches for every inch of vertical increase.
This is to guarantee that the ramp is not overly steep and that the user who will be using it can safely ascend and descend it.
3. Factor in landings.

You may need to incorporate landings on your ramp depending on its size, angle, and primary use (for example, someone pulling a wheelchair vs. someone in a wheelchair transferring themself).
A wheelchair ramp has three primary types of landings: a top landing, a bottom landing, and an optional intermediate landing.
4. Add on safety features.

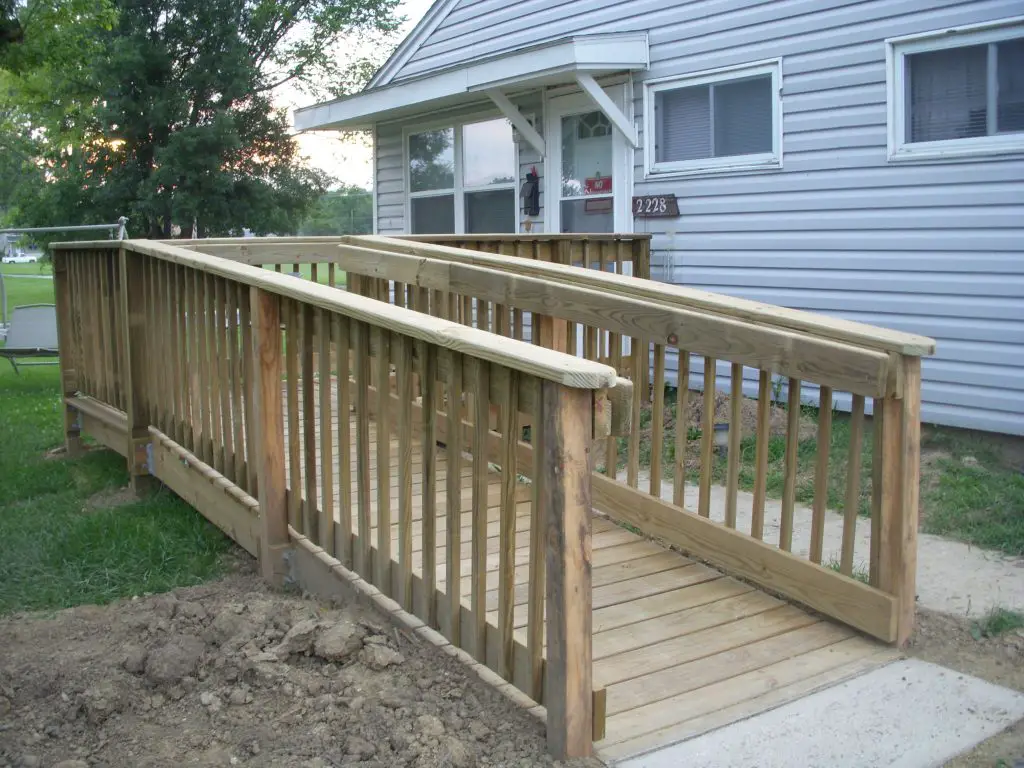
Most wheelchair ramps include additional safety elements such as railings and guardrails.
A handrail can help a wheelchair operator from falling out of the chair or rolling down the ramp, while a guardrail can help the wheelchair operator avoid slipping off the ramp or landing.
Building the Ramp
1. Use treated lumber only.
Treated lumber is significantly more durable than untreated lumber and will withstand moisture and seasonal fluctuations far better.
Even if the structure is just temporary, it is considered a standard of ramp construction to employ treated lumber for the operator’s safety and the structure’s durability.
- In general, medium-length lumber is preferable. That means 16 feet or less in length for 2×4 and 2×6 boards. Choose beams that are 10 feet or fewer in length for 4×4 posts.
2. Build the ramp with screws.
Nails might potentially come undone through time and use, posing a safety issue.
Use screws to assemble the ramp for a stable, long-lasting wheelchair ramp that won’t break apart.
Nails should be used only for joist hangers.
3. Dig posts for permanent ramp.
If you are constructing a permanent structure, you will need to drill post holes in order to properly stabilize and secure the ramp.
The posts should be four inches by four inches (4×4) in size and no more than eight feet apart, with six feet being the best spacing.
- Each post should be cross-braced in at least one position in each direction. This will aid in the lateral stability of the posts.
- Stringers should be fastened to the posts with 3.5 inch screws. To secure the sill to the house, use 1/4 inch by 4 inch high shear strength screws at each load joint.
- Use joist hangers on the stringers if they are not at ground level or very close to it. Hanger nails 1 and 5/8 inch in length are used to secure these. To maintain a sturdy framework, use screws instead of nails for any other fastenings.
4. Lay down an anti-slip surface.
Some municipal ordinances require an anti-slip running surface that runs the whole length of the ramp.
Even if this precaution is not essential, building and safety professionals strongly encourage it.
There are numerous alternatives for generating an anti-slip surface, and your choice may be influenced by personal preferences.
- For a wooden ramp, you can use grit tape, strips of roofing or shingling, or a polyurethane finish coated with sand. All of these items can be found at most hardware or building supply stores.
- An anti-slip surface for a concrete ramp can be created by brushing the concrete with a broom while it is still drying/hardening to create a rougher, less-smooth texture.
Tips
- Hiring a contractor who specializes in accessibility concerns to install your ramp is a good idea.
- Construction codes can be found at your local building department office, the library, or online. Check your local phone book for addresses and phone numbers, or look up building codes in your area online.
- For ideas and inspiration, look at images or actual ramps in your community. Speak with the owners and ask for building advice, or find out who their contractor was.
- When examining your site and developing plans, make sure to thoroughly analyze ADA regulations, including any exceptions (typically located in appendices).
Warnings
- You may be held legally accountable if someone is injured on your property or if you offer a ramp that does not meet all of the required specifications.
- When selecting materials for your ramp, keep local factors in mind. For example, if there is a lot of snow on the ground most of the time, extra traction and a roof/gutter may be required.
Our Thoughts
It is suggested that anyone seeking a wheelchair ramp consult with a professional contractor that is aware with ADA compliance and has expertise designing and building such.
While do-it-yourself choices can save money, the amount of expertise required to build a safe, useable structure is beyond the ordinary homeowner’s capabilities.
A professional experienced in disability renovations may also be able to assist you in evaluating the safety and accessibility of your home and determining what, if any, additional renovations are required.
Contact at least three licensed contractors to verify you’re working with someone who is knowledgeable about all elements of your project and that you get the best price.
Frequently Asked Questions
What is the proper wheelchair ramp slope?
For commercial use when somebody is sitting in the wheelchair or scooter while it climbs the ramp, ADA recommends a 1:12 slope, which means that every 1″ of vertical rise requires at least 1′ (12″) of ramp length (5 degrees of incline).
How long can a handicap ramp be before a landing?
A ramp with a slope between 1:12 and 1:16 can have a maximum horizontal length of 30′ | 9.14 m without a landing.
A ramp with a slope between 1:16 and 1:20 can have a horizontal run up to 40′ | 12.19 m before requiring a landing.
How long does it take to install a ramp?
Most ramps can be installed and ready for use within a few hours.
Only the smallest percentage of very large ramps might take two days for completion.
What is a 30% slope?
It means that if you travel a distance up the incline, the ratio of vertical to horizontal distance (times 100) would give you the grade.
We usually represent the steepness of a slope with an angle, but this essentially does the same thing.
Can I use plywood for a wheelchair ramp?
The longest ramp possible for the conditions is best.
An eight foot ramp is easiest because plywood is readily available in four by eight foot sheets.
A length greater than eight feet requires an additional length of plywood for the surface run.